
Network-attached storage (NAS) on local network with Raspberry PI
Do you have a few old external USB drives lying around collecting dust? Well, you could put them to good use with a simple and robust NAS (Network-attached storage) using a Rasberry Pi.
Moreover, if you have plenty of old travel photos on that external drive, you could host my open source NodeJS app (GitHub repo here) to display them on an old tablet, just like an interactive smart photo frame.
I've tested this on Rasberry Pi 3 and 4, but really any should work. If your external USB drive has it's own power source, you can connect it to RPi directly, but if it doesn't have it's own power source, you might need an externally powered USB hub to which you'll connect your USB drives. Raspberry might not be able to suply enough current to power more than 2-3 external USB drives.
Prerequisites
I assume you already have Raspberry Pi OS installed, but if not, install it from official source https://www.raspberrypi.com/software/ (make sure you enable SSH during intallation).
If you already have a different Linux distribution installed, this should also work, but you might need to slightly modify some of below commands.
-
ssh to your RPi and update your system
sudo apt update && sudo apt full-upgrade -
Connect any USB drives you want to make accessible over the network.
Raspberry Pi OS should automatically detect USB drives when you plug them in. To see what drives it found run:sudo blkid /dev/mmcblk0p1: LABEL_FATBOOT="boot" LABEL="boot" UUID="17B6-FC00" BLOCK_SIZE="512" TYPE="vfat" PARTUUID="834cc527-01" /dev/mmcblk0p2: LABEL="rootfs" UUID="b101bb80-3338-4b94-a775-b3844f8f2aa8" BLOCK_SIZE="4096" TYPE="ext4" PARTUUID="834cc527-02" /dev/sdc1: LABEL="SAMSUNG" BLOCK_SIZE="512" UUID="8E84B2B084B29A63" TYPE="ntfs" PARTUUID="01022cb5-01" /dev/sdd1: LABEL="SAMSUNG" BLOCK_SIZE="512" UUID="1E904FEC904FC8CB" TYPE="ntfs" PARTUUID="d9d225e4-01" /dev/sdb1: LABEL="Elements" BLOCK_SIZE="512" UUID="DC74B02074AFFB80" TYPE="ntfs" PARTLABEL="Elements" PARTUUID="ae55a0c1-17a6-41a5-bf6f-c4d86a960b7e" /dev/sda1: LABEL="SAMSUNG" BLOCK_SIZE="512" UUID="0C6EBE646EBE466C" TYPE="ntfs" PARTUUID="411e3984-01"or
ls -l /dev/disk/by-uuid

lrwxrwxrwx 1 root root 10 Aug 11 20:28 0C6EBE646EBE466C -> ../../sda1
lrwxrwxrwx 1 root root 15 Aug  9 22:07 17B6-FC00 -> ../../mmcblk0p1
lrwxrwxrwx 1 root root 10 Aug  9 22:08 1E904FEC904FC8CB -> ../../sdd1
lrwxrwxrwx 1 root root 10 Aug  9 22:08 8E84B2B084B29A63 -> ../../sdc1
lrwxrwxrwx 1 root root 15 Aug  9 22:07 b101bb80-3338-4b94-a775-b3844f8f2aa8 -> ../../mmcblk0p2
lrwxrwxrwx 1 root root 10 Aug 11 20:28 DC74B02074AFFB80 -> ../../sdb1
for a bit more visual representation, try:
lsblk

NAME        MAJ:MIN RM   SIZE RO TYPE MOUNTPOINT
sda           8:0    0   1.8T  0 disk
└─sda1        8:1    0   1.8T  0 part /media/pi/SAMSUNG2
sdb           8:16   0   3.6T  0 disk
└─sdb1        8:17   0   3.6T  0 part /media/pi/Elements
sdc           8:32   0 931.5G  0 disk
└─sdc1        8:33   0 931.5G  0 part /media/pi/SAMSUNG1
sdd           8:48   0 931.5G  0 disk
└─sdd1        8:49   0 931.5G  0 part /media/pi/SAMSUNG
mmcblk0     179:0    0  29.7G  0 disk
├─mmcblk0p1 179:1    0   256M  0 part /boot
└─mmcblk0p2 179:2    0  29.5G  0 part /
We're interested in
/dev/sda1,/dev/sdb1,/dev/sdc1and/dev/sdd1
Make a note of UUID for each drive you want to use. -
Create folders for each drive, where you'll see their contents
sudo mkdir /mnt/nas1
sudo chown -R pi:pi /mnt/nas1
Repeat above for each drive, you're configuring.
-
Install missing dependiencies
Make sure your system is able to read NTFS partisions by installing ntfs-3g package It should already be there if you're using original Raspberry Pi OS. If not install it.sudo apt install ntfs-3gYou might need to also install Extended FAT package to read FAT partitions.
sudo apt install exfat-fuse exfat-utils -
Create a user that will access mounted drives
I'm creating a new user called "nas" for the purpose of accessing NAS resources over network.sudo useradd nas sudo passwd nas New password: Retype new password: passwd: password updated successfullyFind out new user's id and group id.
id -u nas
id -g nas
In my case both returned "1001".
-
Automatically mount drives
Now that we have all the dependencies installed, we need to make sure our drives mount automatically after system restart.sudo vim.tiny /etc/fstabwhich if unmodified, should look similar to this:
proc            /proc           proc    defaults          0       0
PARTUUID=834cc527-01  /boot           vfat    defaults,flush    0       2
PARTUUID=834cc527-02  /               ext4    defaults,noatime  0       1
# a swapfile is not a swap partition, no line here
#   use  dphys-swapfile swap[on|off]  for that
Don't change any of that, just leave it as it is and add your entries below. Remember to change the values of
UUID,uidandgidwith the values we noted before.# Drive 1 - 2T UUID=0C6EBE646EBE466C /mnt/nas1 auto nofail,uid=1001,gid=1001,noatime 0 0 # Drive 2 - 1T UUID=1E904FEC904FC8CB /mnt/nas2 auto nofail,uid=1001,gid=1001,noatime 0 0 # Drive 3 - 1T UUID=8E84B2B084B29A63 /mnt/nas3 auto nofail,uid=1001,gid=1001,noatime 0 0 # Drive 4 - 4T UUID=DC74B02074AFFB80 /mnt/nas4 auto nofail,uid=1001,gid=1001,noatime 0 0Your system might have automatically mounted all the drives or if you're debugging or changing something and you had your drive already mounted, you'll have to unmount it and mount it again for the changes to take effect.
sudo umount /dev/sda1
sudo umount /dev/sdb1
sudo umount /dev/sdc1
sudo umount /dev/sdd1
Mount defined drives
sudo mount -av

/proc                    : already mounted
/boot                    : already mounted
/                        : ignored
/mnt/nas1                : successfully mounted
/mnt/nas2                : successfully mounted
/mnt/nas3                : successfully mounted
/mnt/nas4                : successfully mounted
Now we have drives mounted that should persist over system restarts.
Share mounted drives on local network
-
Install Samba
Samba is a suite of applications that implements the Server Message Block (SMB) protocol. Many operating systems, including Microsoft Windows, use the SMB protocol for client-server networking. Samba enables Linux / Unix machines to communicate with Windows machines in a network, which in our case simply means sharing that mounted drive(s) over network.sudo apt install samba samba-common-bin cifs-utils -
Create samba user
Remember we created a new system usernas, now we need to make it a Samba user. The password we created before for that user was for RPi OS, now you can specify a different password to use when accessing your resources over network. You can keep passwords the same for ease of use.sudo smbpasswd -a nas New SMB password: Retype new SMB password: Added user nas.The
-aswitch adds usernasto the Samba password list.
If you need to modify existing Samba user you can do it with:sudo smbpasswd nasTo list existing samba users run:
sudo pdbedit -L -v -
Configure network shareable resource
Open Samba config filesudo vim.tiny /etc/samba/smb.confGo to the bottom of the file and add
[nas1]
comment = My USB drive 2T
path = /mnt/nas1
# you can list multiple users here separated by space
valid users = nas
force group = users
create mask = 0660
directory mask = 0771
read only = no
# if you need unathenticated access (guest users), uncomment below line
# guest ok = yes
Add a section like this for each of your drives. Changing the group name
[nas1]andpathaccordingly.
Test if the config is correcttestparm Load smb config files from /etc/samba/smb.conf Loaded services file OK. Weak crypto is allowed Server role: ROLE_STANDALONEIf everything is ok, restart Samba to apply new settings
sudo systemctl restart smbdIn case of any issues or simply if you want to see active connections, run:
sudo smbstatus
Map drive on Windows
- Open file manager
- Go to "This PC"
- At the top in "Computer" tab, click on "Map network drive", not the "Add network location". There's a key difference.
- Choose a Drive letter you want to assign to this resource.
- In "Folder" field type in
\\RASPBERRYPI\nas1or whatever location your Raspberry is at - Leave "Reconnect at sign-in" ticked.
- Click Finish
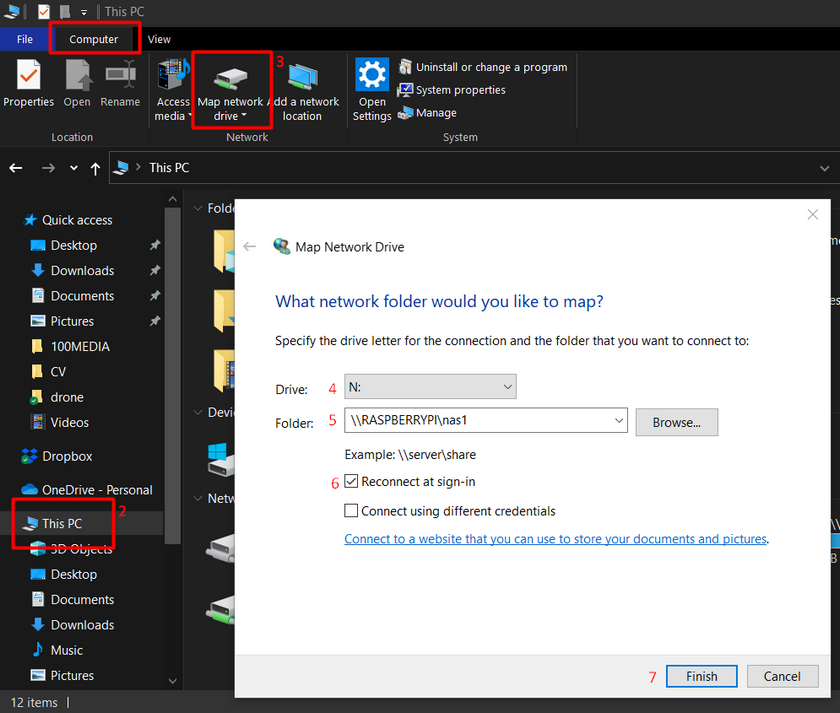
On the credentials popup, Windows will most likely prefil your current user details. If that's the case click "More choices" and then "Use a different account". This will allow you to specify your Samba username and password. For us the user was nas.
Map drive on Linux
If you want to access local drives on Linux (or Mac) it should be very similar to what we've done before.
sudo apt install cifs-utils
sudo mkdir /mnt/nas1
sudo mkdir /mnt/nas2
sudo mkdir /mnt/nas3
sudo mkdir /mnt/nas4
sudo vim /etc/fstab
Add below lines to the bottom of fstab file
//192.168.0.100/nas1  /mnt/nas1 cifs    uid=0,username=nas,password=******,iocharset=utf8,file_mode=0777,dir_mode=0777,sec=ntlmssp  0  0
//192.168.0.100/nas2  /mnt/nas2 cifs    uid=0,username=nas,password=******,iocharset=utf8,file_mode=0777,dir_mode=0777,sec=ntlmssp  0  0
//192.168.0.100/nas3  /mnt/nas3 cifs    uid=0,username=nas,password=******,iocharset=utf8,file_mode=0777,dir_mode=0777,sec=ntlmssp  0  0
//192.168.0.100/nas4  /mnt/nas4 cifs    uid=0,username=nas,password=******,iocharset=utf8,file_mode=0777,dir_mode=0777,sec=ntlmssp  0  0
Remember to change the IP address to whatever your local RPi is using. The username and password should probably be stored in a separate file, but just to keep things simple, I'll leave it inline.
Mount your drives
sudo mount -av